Many novice car owners often ask questions about cleaning injectors. injection engines. The question is whether it is possible to clean them yourself or whether you must contact specialists at a service station. Also, many are interested in such a procedure as without removing it from the engine. Let's try to understand this issue.
Operation of dirty injectors
If the elements are clogged, this can be felt by the reduced power density car engine. Then detonation will occur at the moment of acceleration. The symptoms of dirty injectors are especially pronounced on idle speed. Engine operation becomes unstable, the starting of the power unit deteriorates, and fuel consumption increases. The exhaust becomes more toxic. It is best to diagnose the operation of injectors at a service station.
If diagnostics by specialists reveal that the main cause is the injectors, then they need to be washed. There are options when the elements are removed for cleaning. But it is also possible to wash the injectors without removing them from the engine. For those who will do it themselves, it is better to choose the second option. Naturally, if you disassemble the motor and remove the parts, the process of cleaning them is greatly facilitated. But this is not always convenient.
Diesel injectors
In such an engine, the injectors operate at higher pressures and high temperatures. They get clogged more often. But these cleaning methods are not effective for them. Cleaning the injectors without removing them from the engine is not suitable here. Cleaning a diesel engine without removing it is simply ineffective. It is necessary to disassemble, remove, diagnose on stands.
Causes of pollution
Flushing injectors is an operation that any engine needs.

Sooner or later, the owners of all, and even the most expensive cars you'll have to go through this. Knowing the main sources of contamination, you can delay as much as possible the moment when the problem can only be solved by washing. main reason clogs in the injectors - this is low-quality fuel with a large volume of heavy elements. They are dissolved in fuel and easily pass through any filters. When the engine is stopped, all these elements settle on the injectors. And the lungs immediately evaporate.
Methods for cleaning injectors
Today there are two effective methods for cleaning elements. To choose the one that will be most effective, you will have to study both options. So, washing injectors on special stands is popular.

For this purpose, special cleaning fluids are used. This method quite effective. But if you clean old and very dirty injectors, it will not give any results. The stand effectively cleans ceramic mechanisms. Processing with liquids is also used. In this case, it is possible to wash the injectors without removing them from the engine, or with removal. But that's not all. Below we will consider another, no less popular method.
Cleaning method using additives
It is considered the simplest. So, you just need to add a special additive with detergent properties to the gas tank.

These liquids are produced by all self-respecting manufacturers of car cosmetics. If the task is to clean the entire engine power system, then you need to purchase injector cleaning fluid. One 0.5 liter bottle is filled with 50 liters of fuel. In this way, not only the injectors are washed without removing them from the engine, but also all elements of the power system. This includes fuel tank, pressure regulation system, fuel pump and injectors. When choosing this option, it is worth considering that the method is associated with certain risks. All dirt, deposits and other substances that have been washed out of the tank and fuel line using additives can further clog the valve in the pressure regulator.

Therefore, such processing may only be advisable if preventive measures. This is not the most effective way to flush injectors without removing them from the engine. Reviews from those who carried out this are rather negative. Another option is flushing using special systems for supplying flushing fluid. The process is carried out with the engine running, and it runs on a detergent solvent. This method can be considered quite effective. The result in most cases is assessed as positive.
Cleaning without removal: preparation
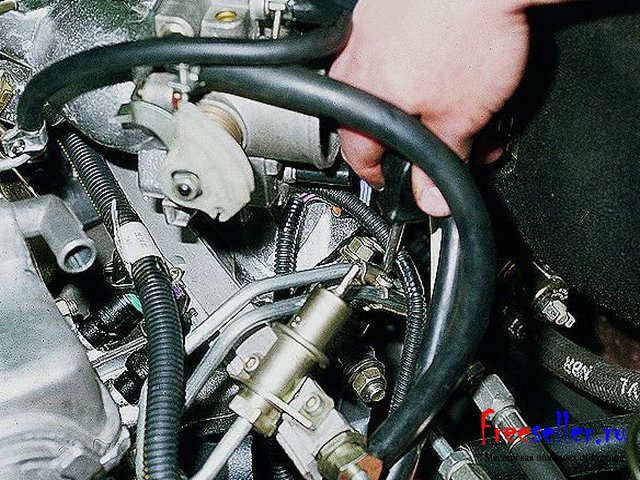
Most car enthusiasts try to pour flushing fluid into the tank - this is a mistake, and there is no need to do this. In the process must be disconnected from common system nutrition. It is important to remember that in fuel rail there is pressure. This do-it-yourself washing also involves dismantling the hoses. Therefore, you need to work as carefully as possible.

Next, you need to prepare a temporary engine power system. A plastic bottle is suitable for this. A pre-prepared cleaner is poured into it. For a motor with a working volume of 2.5 liters, 1 liter of the substance should be filled. You can use liquid at the rate of 100 g. per 0.5 liters of engine volume. Next, a little fuel is also added to the bottle. Fill in half of the cleaner. Then a hose is put on the neck of the bottle and tightened with a clamp. The pipe must be cut into a separate, pre-prepared fuel pump.
Cleaning process
Next start and warm up power unit. You also need to remove the main fuel pump fuse. Several launches will be required. This will relieve pressure in the fuel system. The hose that supplies fuel to the injectors is removed, and the newly assembled structure is installed in its place. They also dismantle it from the “return” (it is “jammed”). Then turn on a separate fuel pump and check the tightness of all connections. If everything is in order, then you can proceed to the main part of the process. Start the engine and let it run for about 5 minutes. After this, he should “rest” for a few minutes. During this time, the cleaner will soak away all deposits. Then the engine starts again. This time he is allowed to work for about 30 minutes.

This time is enough for all contaminants to burn out. The engine should run at idle for the entire half hour. You can sometimes raise the speed to 2.5 thousand. After the process is completed, the system is disconnected and connected regular system nutrition. Now you can start the engine and leave it for 10 minutes. During this time, the remaining cleaner will burn out. At the same time, you can check the tightness of all connections. Next, turn off the engine and install new spark plugs. Reset errors of the electronic control unit, if any. You can additionally carry out diagnostics and make sure that the power unit is working as expected. Is doing-it-yourself injector cleaning effective? Yes, quite effective. Moreover, it gives results in Russian realities, when it needs to be done every 20 thousand km.
Traditional methods
You shouldn’t stop at just these methods. Some car owners like the way additives work. Others say that they pour a little kerosene into the tank and are not aware of such problems. Still others say that using additives is a lottery, and not washing injectors without removing them from the engine. Advice from experienced car owners confirms that the most effective way- This is cleaning using a bottle and a separate gas pump.
The cost of cleaning injectors at car services is approximately 1,500 rubles, but you can clean them yourself.
To clean the injectors yourself you will need:
Carburetor cleaner (about 2 cans);
Brake hose;
Insulating tape;
Plastic clamps for electrical wiring;
A piece of 2-core wire;
12 Volt light bulb;
Knife (stationery or other)
The cost of everything above is approximately 300-400 rubles.
Injector cleaning process
Removing the fuel rail to clean the injectors:
1. Disconnect the negative wire from battery.
2. Remove the ramp with the fuel pressure regulator.
3. Disconnect the vacuum hose from the regulator.
4. Using two 17mm wrenches, unscrew the fuel pipe fittings, releasing the fuel pressure.
5. Disconnect the electrical connector of the ramp.

6. Phillips screwdriver unscrew the screw of the bracket securing the fuel pipes... and remove it.

7. Use a 5mm hexagon to unscrew the two ramp mounting screws.

8. By pulling the ramp along the axis of the injectors, remove all four injectors from seats and remove the ramp towards the left side of the car.

Removing the injectors
1. Squeezing the spring clip, disconnect the electrical connector of the injector.

2. Use a screwdriver to move the injector lock along the ramp... and remove it.

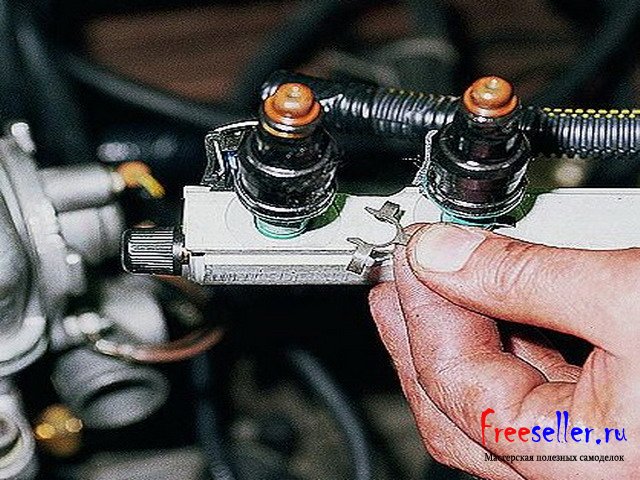
3. While rocking the nozzle, remove it from the ramp.

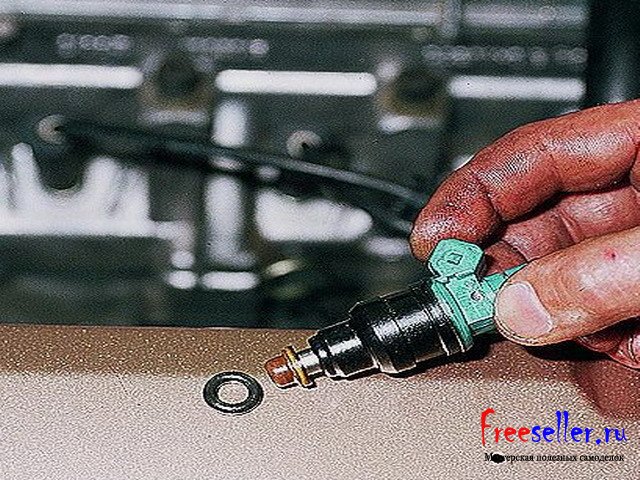
4. Using a screwdriver with a thin tip, remove the sealing rings... from the nozzle and the nozzle body.


Making a homemade device for cleaning injectors
1) Cut off the metal pressed nut from the rubber brake hose on one side.
2) Place the cut end of the hose onto the nozzle and secure it with a plastic clamp.
3) At the other end of the hose, insert the tube included in the carburetor cleaner kit (if the kit does not include one, use a tube from WD-40 fluid). The remaining space between the tube and the brake hose can be filled with fum tape, unilock, or the remains of sound insulating material can be used. Then wrap it tightly with electrical tape.


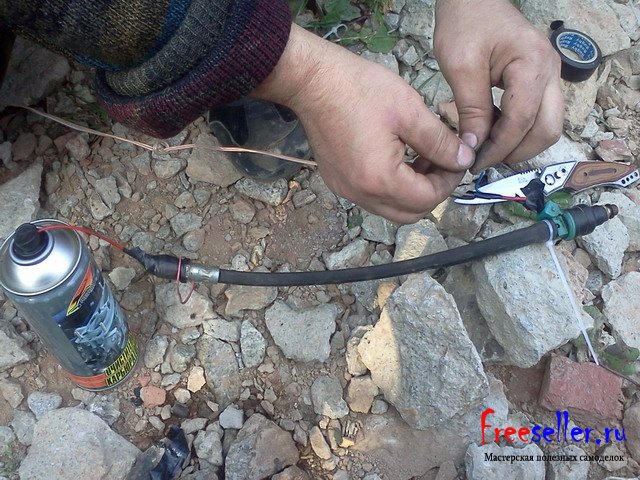
Rice. 1, 2,3. Homemade device for cleaning injectors.
4) Cleaning of injectors occurs when a voltage of 12 V is applied to the injector, and in order not to burn the injector winding, we power a 12 V light bulb in series on the positive wire, in the ground wire we make a break by inserting a switch or alligator clips, or using a working button, only then when you press it. The entire circuit is connected to the battery.

Scheme for switching on the nozzle for cleaning.
1) Create pressure in brake hose, to do this, press the spray canister several times.
2) Press the button and apply voltage to the nozzle, the nozzle begins to spray.
3) Don’t forget to press and hold the cleaner nozzle to maintain pressure in the hose.
4) We clean the nozzle until the spray from the nozzle is uniform.
After cleaning the injectors, we assemble them back onto the fuel rail, using new O-rings on all injectors on the rail side.
Install new o-rings very carefully, without using any tools, after lubricating them motor oil or WD-40 liquid.
Install the injectors in the reverse order of removal, securing them to the ramp with clamps, after tightening them a little.
Reinstall the fuel rail, connect the fuel line, secure the ground terminal to the battery, turn the ignition key in the lock 3-4 times at intervals of 2-3 seconds to create pressure in the fuel rail, and check the tightness of the connection of the pipeline and injectors.
P.S. You should also change the injectors after cleaning them. fuel filter, and preferably a fuel pump grid, and you should only refuel at proven gas stations, and preferably 95 gasoline.
Alexander Borisov, Samara
Engine fuel injection system is more economical carburetor system. It has a number of undeniable advantages in terms of fuel consumption, power and engine dynamics. But it is significantly more difficult to maintain, is very critical to the quality of the fuel used and requires highly qualified maintenance mechanics, which in turn increases the cost of maintenance and repairs. The high price of all components and their poor repairability further raise the bar for car maintenance costs.
The fuel injection system and vehicle ignition system are controlled by the electronic unit management (ECU) an engine that, using appropriate sensors, continuously monitors the engine load, the speed of the vehicle, the thermal state of the engine, and the optimality of the combustion process in the cylinders. Fuel is supplied to the engine intake manifold using injectors.
An injector is a high-precision electromechanical valve in which the shut-off valve needle is pressed against the seat by a spring. When an electrical impulse is applied from the control unit to the winding of the injector electromagnet, the needle rises and opens the nozzle hole.
On the fuel supply side, the injectors are inserted and secured with spring clips in the fuel rail - a hollow tubular part with holes for installing injectors and a fuel pressure pulsation compensator, which serves to supply fuel to the injectors and is fixed to intake manifold. The fuel pressure in the ramp is created by a rotary-type submersible electric fuel pump.
The nozzle side of the nozzle is inserted into the sockets of the intake manifold.
The injector is designed for dosed injection of fuel into the engine cylinder. When an electrical impulse is received, the needle opens the nozzle hole - fuel is supplied in the form of a sprayed cone-cloud into the intake manifold of the car. The amount of fuel injected by the injector depends on the duration and frequency of the electrical pulses.
Injectors operate in difficult conditions:
high temperatures – up to 120 0 C;
high injection pressure 1.0-6.0 kg/cm 2 (the fuel pump supplies fuel from the fuel tank through the fuel line to the fuel rail at a pressure of about 380 kPa (approximately 360 kPa at idle);
resinous and varnish deposits on the working surfaces of the valve as a result of the use of low quality fuel;
soot formation - an ultra-thin slag layer of 5 microns can change the throughput by up to 25%.

If the injectors are dirty:
fuel is supplied unevenly to the cylinders;
insufficient fuel in transient and power modes of engine operation;
engine power and throttle response are reduced;
detonation pops occur during vehicle acceleration;
at idle, engine operation becomes more unstable, and engine starting becomes worse over time;
fuel consumption increases;
exhaust toxicity increases.
Car manufacturers recommend cleaning injector nozzles at least every 20,000 – 40,000 km, depending on the quality of the gasoline used.
This operation at a service station costs $30-50, depending on the design features of the car and the cleaning method.
There are several cleaning methods:
the chemical method is the simplest, but less effective - pouring liquid for washing injectors into the fuel tank. The tank and fuel line must be clean, otherwise the liquid will dissolve solid deposits into a suspended state and the pump will drive all the dirt into the fuel rail and injectors. At the service station, a low-octane cleaning agent is supplied directly to the fuel rail under pressure and the engine is started. But after such cleaning, the exhaust gas catalyst gets into a complex state. In addition, after cleaning you will have to change the oil, as well as oil filter, since the low-octane cleaning agent gets there too;
ultrasonic method - carried out only at service stations, as special equipment is required. This method cannot be used to clean injectors with a ceramic sprayer, due to the fact that in an ultrasonic bath there is a risk of cracking of the ceramic in places of microcracks, which, with significant mileage, are present on this part. In conventional injectors, with a significant mileage, ultrasound can destroy the dried insulation of the solenoid coil wire, which leads to an interturn short circuit and failure of the injector;
cleaning of injectors using solvents is carried out on special stands, the operating principle of which is based on the fact that clean solvent is supplied directly through the fuel rail to the injector, and the spent solvent is passed through special filters that clean it. The device is a looped system that has several injector operating modes and the ability to measure and compare injector performance.
The average operation time for cleaning an injector is 60-90 minutes and depends on the design features of the car.
But you can quite successfully clean the injectors yourself using a simple device, for the manufacture of which you will need the following components:
battery or charger 7 – 12V;
Injector connector (from VAZ 2110) or narrow connectors from car speakers;
a piece of fuel-resistant hose 10cm and internal D 6-7mm, you can use a piece of a broken brake hose;
two clamps with screw clamp D 12 – 15mm;
two wires (any length) with a cross section of 1.0-1.5 mm 2;
light bulb 12V 21W;
any button for closing, possible from a doorbell;
Hi-Gear carburetor cleaner spray or similar.
measuring cup;
stopwatch.
Connectors from car speakers or an injector connector from a VAZ 2110 are soldered to pieces of flexible wires.

The ends of the gas-resistant hose are cut evenly with a sharp knife. Clamps are placed on the hose. A nylon washer of suitable diameter is inserted inside the hose. A 25mm long rubber plug is selected or manufactured according to the inner diameter of the hose. A hole with a diameter of 2 mm is drilled inside the plug, into which the tube from the cleaner can will be inserted.


All parts are coated with Moment glue and dried until the glue is completely dry. After the glue has dried, the parts are coated again and immediately assembled. The spray tube is inserted into the rubber plug, and the plug into the hose.


One clamp is moved to the end of the hose with the plug glued in, we crimp it and leave it to dry for 12 hours.
The fuel rail with injectors is removed from the car.

We release the spring clips, remove the injectors and thoroughly clean everything of dirt and oil. We place the lower parts of the nozzles (sprays) in a narrow container while standing.
External cleaning of injectors - cleaning the nozzle and the funnel-shaped surface around the nozzle.
Fill the container with liquid for cleaning the gasoline injection system “WYNN*S” or a mixture of solvent and solvent 647 to a level so that the spray nozzles are completely immersed.
Just quit injectors Cannot be used in solvent. Do not allow any cleaner or solvent to get into the electrical part. injectors.
We leave the nozzles in the container for a while depending on the degree of contamination. All carbon deposits should dissolve or soften. After this, we rivet a piece of aluminum wire with a diameter of 2.5-4 mm and with this scraper we clean off the remaining carbon deposits in the nozzles and on the outer surface of the nozzles.
The injectors are ready for internal cleaning.
We assemble the device outdoors or in a well-ventilated area. cleaning injectors. It is advisable to secure the hose with the spray tube in a vise or clamp at the height of the valve of the cleaner can.

The nozzle is inserted into the free end of the hose and crimped with a second clamp.
Wires with terminals are connected to the injector connector. One wire from the injector is connected in series through the light bulb to the positive of the battery or power supply, and the second in series with the button to the negative.

Press the valve of the cleaner canister. The nozzle in this position should not let a drop through. We press the button, the nozzle turns on and the degree of contamination of the nozzle can be judged by the spray pattern of the cleaner.
The injectors of both injection and diesel engines become clogged over time. This is due to the fact that the fuel contains small impurities that the filter is not able to leave on its housing (and even more so if it is old and/or of poor quality). They are commercially available, but many of them are quite expensive and show questionable results. Therefore, car owners have come up with several simple methods that, using improvised means, can garage conditions clean injectors of similar quality professional cleaning at the stands. If you have thoughts or your own suggestions on this matter, share them in the comments.
Method one - using carburetor cleaner
If instead special means To clean the injectors, you have a carb cleaner lying around, then in a garage you can clean the gasoline injector yourself, even with a carburetor cleaner from a can, rather than buying liquid for the injector. Next we describe one of these methods. To work you will need:
- two pieces of clean rags;
- small-section copper insulated wire about a meter long;
- plastic clamps (ties);
- awl;
- electric battery with a voltage of 9 V (the popular “Krona”);
- a piece of oxygen hose 4...5 cm long;
- insulating tape;
- (when choosing, pay attention to the working cap of the cylinder with a diameter that matches the inner diameter of the oxygen hose so that it can be inserted inside);
- safety glasses and gloves.
You need to work with carb cleaner carefully, using personal protective equipment, so you must first put on goggles and gloves. Work algorithm:

- remove the injector from the fuel manifold and clean it from the outside using a rag (it is better to first remove the rubber seals from it);
- cut a piece of wire into equal parts and clean the insulation on one side of the resulting wires using a knife;
- using electrical tape, connect the stripped ends of the wires to the battery;
- at the opposite ends of the wires, use an awl to slightly expand the insulation for further connection to the nozzle;
- make a hole in the carb cleaner cap using an awl in its upper part;
- insert the cap into the rubber hose (in this case, the “original” hole of the cap will be plugged with the hose) and clamp them with a plastic clamp;
- Install the resulting adapter onto the carb cleaner cylinder;
- Connect the nozzle, cleaned from the outside, to an adapter made of a rubber hose and tighten it with a clamp;
- connect the nozzle to the battery, you will hear a click indicating that the nozzle has opened;
- place the adapter with the nozzle onto the carburetor cleaner bottle;
- gently apply pressure (press);
- in this case, the carburetor cleaner will come out in a vertical stream through the nozzle (that's what glasses are for!).
Clean until the pattern is even. After one cleaning, you need to turn the nozzle upside down and repeat the operation. Next, you can move on to cleaning the remaining injectors.
Method two - using a flushing cylinder
This method can also be performed in the garage using improvised means; it is good because there is no need to dismantle the engine injectors, but as a cleaning composition you will need to purchase a solvent (Vince, Laurel, High Gear or another). To work you will need:

Cylinder with connected filter
- a clean two-liter plastic bottle with a tight-fitting cap;
- compressor (to be able to produce 3 atmospheres);
- flushing liquid (about one liter);
- drill and drill bit with a diameter of 13 mm;
- two clamps (12...14 mm);
- fuel filter;
- two automobile nipples;
- a hose with a diameter of 12 mm, about a meter long;
The operating algorithm is as follows:

After this, you should start the engine and let it idle for 15 minutes and rest for 15 minutes. Next, start the engine again and let it run until the cleaning liquid in the bottle runs out. When the engine stalls, you must Carefully release the pressure from the bottle! This can be done either using a nipple or simply by carefully unscrewing the cap.
After this, you can disassemble the resulting system, connect the fuel hose in place, and return the chip to its original position. After everything is assembled, you need to start the engine and let the car run for 5...10 minutes. It is highly advisable to change the oil and spark plugs (especially spark plugs) after performing the described procedure.
The cleaning method is quite simple, but it has a significant drawback - the lack of visual monitoring of the condition of the injectors. It can be used for preventive purposes if there is a suspicion that the injectors are clogged.
Method three - adding acetone

On numerous forums on the Internet you can find many topics about whether you should add acetone to your gas tank. Despite the fact that official representatives of automakers and oil refining companies do not say a word about this, many domestic (and not only) car owners add a small amount of pure acetone to the gasoline they use.
This action leads, firstly, to an increase in the octane number of gasoline, and secondly, it causes a cleaning effect for the elements of the fuel system (washes away carbon deposits), and also binds the water in gasoline and removes it along with exhaust gases. As a rule, the effect of using acetone is felt after it has been added to a full (or almost full) tank of gasoline, and this fuel has subsequently been burned while driving.
A few words about proportions. The amount of acetone added to gasoline depends, firstly, on the octane number, and secondly, on the quality of the fuel (admixtures of water and harmful impurities in it). If the gasoline is good, then it is enough to add 30 ml for every 10 liters of gasoline. As it worsens, the amount of acetone can increase to 150 ml per 10 liters of gasoline. However, don’t get too carried away with adding acetone! This is due to the fact that since this remedy increases octane number, then if its value is exceeded compared to that for which the engine is designed, this can lead to gradual failure of the motor. And the greater the value it is exceeded, the faster the engine “knocks”.
Method four - use of Dimexide
To clean injectors, you can also use the popular drug Dimexide, which is sold in any pharmacy and is very inexpensive. So, for work you will need:

Washing unit
- the drug Dimexide (500 ml or more, depending on the degree of contamination);
- a clean container for liquid with a lid, such as a bottle with a tight-fitting lid of about 500 ml;
- two nipples;
- drill (screwdriver) and 13 mm drill (for nipple diameter);
- four containers in the form of test tubes, where contaminated liquid from the nozzles will be collected (separately for each nozzle);
- battery or power supply 12 V;
- air hose;
- clamps;
- Solvent solvent.
The cleaning procedure consists of the following steps:
- Dismantling the ramp with nozzles.
- Construction of a washing stand.
- Checking injectors for performance (mounted with a ramp on a stand with transparent containers to evaluate the spray pattern and the amount of fuel released).
- Soaking individual nozzles in a container with dimexide (necessarily in a vertical position so that this aggressive agent does not get on the rubber seals).
- Flushing injection nozzles dimexide under pressure for 10-15 minutes.
- Solvent washing and purging compressed air(so that there is no product left in the nozzle).
Conclusion
As you can see, cleaning injection nozzles yourself in a garage environment is quite acceptable and effective. However, it must be performed, firstly, provided that you are confident that you will do everything correctly, that is, you have experience in performing such repair work. Secondly, the degree of contamination of the injectors is medium or low. If the injector is very clogged, it makes sense to seek help from a car service center, where they will wash the injectors using a liquid or ultrasonic cleaning unit.
– the key to reliable and economical engine operation. The most serious consequences (up to the impossibility of starting the engine) can arise from clogged injectors. For emergency situations, and also in order not to waste money in car services, it is worth knowing how to clean injectors with your own hands.
Read in this article
General information
It's no secret that the majority modern drivers Even at the driving school stage, they devote too little time to studying the general principles of operation of vehicle components and assemblies or completely ignore this part of the training course. In this regard, the topic of this article will be relevant for many.
So, the nozzle, or as it is also called, is part of the injection system for gasoline and diesel engines. The purpose of the device is to atomize fuel to form a fuel-air mixture in the intake manifold or combustion chamber. According to injection methods, there are four types of nozzles: mechanical, electromagnetic, piezoelectric, hydraulic. However general principles The work and basic structure for all types remains the same.
IN top part Fuel is supplied to the injectors under a certain pressure. It passes through the internal channel and is then sprayed through the outlet when the valve is opened. The better the spraying, the more uniform and better the result. fuel-air mixture. During operation, the hole gradually becomes overgrown with various resinous deposits, resulting in worse spraying.
Instead of fog, you get streams that mix very poorly with the air. As a result, the engine begins to work intermittently. To resume normal operation of the injectors, you need to return the exhaust ports to their original capacity. In particularly advanced cases, ultrasonic cleaning of the injectors is used to remove deposits that can completely block the outlet. This procedure is possible with special equipment and is quite expensive. Therefore, even car service centers offer injector washing and other methods of cleaning them, which are quite accessible at home or in a garage.
How to determine that injectors need to be cleaned

In general, experts advise carrying out this operation every 30,000 kilometers. Especially considering the quality of fuel at domestic gas stations. Here are the main signs that the injectors are clogged:
- engine starting is difficult;
- after starting the engine;
- engine power is lost, throttle response deteriorates;
- increased fuel consumption;
- engine malfunctions during acceleration;
Such symptoms do not appear immediately, progress gradually and are clearly noticeable when the average mileage has already begun to reach about 100,000 kilometers. However, the worse the fuel quality and general state power supply system, the sooner this will happen.
How to clean injectors yourself


Different drivers' methods for cleaning injectors at home may differ slightly. It all depends on technical capabilities and availability of free time. However, in any case there are some similar points. Firstly, you will need a special liquid that can chemically remove tar deposits. Secondly, the injectors will have to be removed and then put back. And finally, thirdly, forced operation of the solenoid valve inside the device will be required.
- The first method (very common). You will need keys (to remove the injectors), two wires with terminals at the ends and cleaning fluid. First, as already mentioned, the injectors need to be removed. Typically, drivers remove the fuel rail, and then remove the injectors from it. The degree of contamination of each of them can be assessed with the naked eye. One of the wires is connected at one end to car battery, and the other (with a terminal) to the contact on the injector. The second wire will be connected only to the injector. A cylinder with a cleaner is connected to it through the inlet. This is often done directly, but some drivers prefer to do it through a piece of fuel hose. Next, holding the nozzle with one hand, you need to press on the spray bottle so that the nozzle cleaning liquid begins to be pumped inside. At the same time, you need to close the second wire on the battery, activating the solenoid valve mechanism. Some technicians do this directly, while others perform the procedure, for example, through a light bulb (to reduce the voltage supplied to the nozzle). The valve should be opened for 2-3 seconds. The procedure is carried out until a good atomization of the liquid is achieved.
- The second method resembles the procedure in a car service. For this, you will have to assemble a stand for cleaning injectors from available materials. There are many options online. The main difference between them is the materials used. In any case, its operation will be similar to that of the factory installation. The principle and main advantage is that all four nozzles are processed simultaneously. In addition, it is possible to compare spraying and achieve the same spray pattern.
- The third method is to restore normal operation injectors without removing them. That is, right on the engine. To do this, you will need a flushing cylinder, which you can easily make yourself from a two-liter bottle. plastic bottle. A hole for the nipple is drilled from the bottom side. An air compressor with a pressure gauge will be connected here. A hose is mounted on the side of the cap for connection to the fuel rail. To clean the injectors without removing the engine, you need to pour a special liquid for cleaning injectors into the flushing cylinder. Then connect the cylinder to the system, having first disconnected fuel pump. Afterwards you will need to start the engine and turn on the compressor to supply liquid. And when it is completely used up, put everything back together. The disadvantage of this procedure is that it is impossible to visually assess the degree of contamination of the injectors, the degree of their cleaning, or the quality of fuel atomization.
- The fourth method is very effective, but also the most difficult. It is used in the most advanced cases of nozzle contamination. We are talking about ultrasound. To work, you will need an ultrasonic bath for cleaning injectors, which you can assemble yourself. Finding an assembly diagram on the Internet is not difficult. The downside is that knowledge of physics, experience and skills are required.
- The fifth method should be considered only preventive. It consists of pouring special liquids into the fuel tank, which cleans both the entire system and the injectors. This cleaning is carried out directly while the engine is running. However, it should be remembered that in this case, mechanical contamination of the injector filters is possible.
What's the result?
In all cases of cleaning injectors and removing them from the engine, car repair shops strongly recommend replacing the filters fine cleaning and all rubber seals. Practice shows that in some cases the filters do not need to be changed, and it will be enough to lubricate the rubber bands with silicone grease.
As can be seen, when regular care behind the car, you can clean the injectors in conditions own garage. This can be done in several ways, and in all of them, except ultrasonic, you will need a product for cleaning the injectors of a gasoline or diesel engine.
The composition is usually purchased in stores selling fuels and lubricants and automotive products. Please note that cleaning agents of this type are quite aggressive and flammable, so it is recommended to work with protective gloves and also protect your eyes.
Read also
Signs of malfunction and checking injection nozzles without dismantling. Diagnostics of injector power supply, performance analysis. Tips and tricks.
