Most cars built from the late 70s to early 80s are equipped with catalytic converters. exhaust gases(colloquially -), which can significantly reduce the toxicity of waste materials, reducing the damage caused environment. Enough interesting fact is that the catalyst can maintain functionality only under conditions of ideal mixture formation, in which 1 part of fuel contains from 14.6 to 14.8 parts of atmospheric air with a normal oxygen content. To prevent the mixture from being over-enriched or over-lean, it is necessary to use electronic control fuel supply - in such a system, the quality of the combustible composition is controlled by a lambda probe. Despite its location in an aggressive environment, this device is quite fragile and unstable, and is subject to frequent damage. If the lambda probe in your car has stopped working, signs of a malfunction can be detected without specialized equipment - it is impossible to continue operating the vehicle.
Mechanism of action
The lambda probe determines the chemical composition by searching for oxygen in them and determining the percentage. In the normal state of the mixture, this figure is 0.1–0.3% - small fluctuations are allowed due to the fact that the fuel supply mode to the engine cannot be stable over a significant period of time. The lambda probe is installed directly into the exhaust manifold - usually its installation is carried out at the junction of the pipes extending from various cylinders (in common parlance - “pants”), although there are other options.
Meet various modifications lambda probes - as well as vehicles of previous years of production, the devices have a two-channel layout. They can only determine the presence of a deviation in the oxygen content to positive or negative side, which is accompanied by a change in the voltage of the electrical signal transmitted to the electronic unit. However, all modern cars of the middle and elite classes are already equipped with broadband-type lambda probes, which are already designed to determine the percentage deviation of the content of the required element from the norm. Thanks to this, a significant improvement in engine performance is achieved:
- Stability of speed retention increases;
- Fuel costs are reduced;
- The resource of the vehicle increases.
If you are interested in the electrical engineering side of the lambda probe, then it is worth mentioning that this device cannot generate a uniform signal. Due to the fact that the standard lambda probe is located in exhaust manifold, when the exhaust gases reach the point where it is located, several operating cycles may already have passed. In this case, the quality of mixture formation deteriorates by 3–5%, which is accompanied by some destabilization of the engine. The lambda probe reacts to this by changing the voltage supplied to the central injection control unit, which takes the necessary measures.
Determining the breakdown
External signs
If the lambda probe malfunctions, a significant deterioration in the quality of the fuel mixture occurs, which is externally expressed in deterioration in engine performance. It is worth saying that there can be many - among them the following main ones can be distinguished:
- Depressurization of the sensor housing, penetration of atmospheric air and exhaust gases;
- Overheating of the lambda probe as a result of inept engine tuning;
- Failure as a result of prolonged exposure to an aggressive environment (aging);
- Blocking of the working surface of the lambda probe with combustion products of low-quality fuel;
- Disturbances in the normal power supply and interruption of the line leading to the control unit;
- A strong blow to the lambda probe housing with destruction of internal components, for example, during active driving on bad roads.
In all cases except mechanical damage, accompanied by depressurization, malfunctions of the lambda probe appear gradually, with stepwise deterioration. Another exception is a broken wiring - however, it cannot be considered a malfunction of the lambda probe itself, so it should be considered in a separate topic for discussion. For everyone else, the following stages of malfunction development can be distinguished.
Video on how to check the lambda probe:
Initially, the device ceases to normally perform its functions in extreme operating conditions of the engine, when its electrical characteristics have already deteriorated so much that the sensor cannot generate. Malfunction of the lambda probe manifests itself in destabilization of speed idle move, which begin to “float” in a fairly wide range, the length of which is 300–600 rpm. Upon reaching very high speed, not belonging to the critical level, a sharp change in the quality of the fuel mixture may occur. In this case, the car may twitch strongly, in some cases abrupt popping sounds can be heard from under the hood, and the warning lamp, signaling abnormal engine operation. When the speed decreases, all signs of a lambda probe failure disappear, but they cannot be ignored.
At the second stage, the device stops working on a cold engine - until the temperature reaches the maximum possible, the car will show all signs of malfunction intake system or gas distribution mechanism. In particular, you will notice a significant reduction in power, extremely slow responses to changes in the position of the gas pedal, and jerking and popping. If the lambda probe malfunctions, the car may twitch and slow down sharply as a result full stop

fuel supply, a. After about 5–10 minutes of driving in such an unpleasant mode, a visible stabilization of the vehicle’s condition occurs - however, it is exclusively temporary.
If you do not take any measures regarding malfunctions of the lambda probe at the previous stage, the device will completely fail, which will cause many negative consequences. In addition to a significant deterioration in dynamics and the impossibility of normal movement in continuous mode, you will be faced with an increase in fuel consumption by 15–30%, as well as a significant increase in exhaust toxicity, which can be determined by the clearly noticeable tint of fuel. Modern cars can generally block all driver actions if the lambda probe is faulty by switching to emergency mode.
Worst option If the above-mentioned depressurization of the lambda probe has occurred, it is impossible to continue operating the vehicle, as this may become a prerequisite engine failure followed by expensive repairs. In this phenomenon, exhaust gases enter a duct that is used to draw in atmospheric reference air to compare the two types of gases and determine the optimal oxygen content. If engine braking occurs, atmospheric air with a minimum amount of impurities passes through - therefore, the lambda probe sees that there is much more oxygen in the manifold than in the environment! The result of this is the formation of powerful negative signals that completely disrupt normal work
injection control unit.
Electronic diagnostics
If you want to know what signs of lambda probe failure can be detected during a professional inspection, you should find specialized equipment. When examining a lambda probe, an electronic oscilloscope is used - some experts recommend using a multimeter, but it can only determine the fact that the device has failed. The device is checked with the engine running, heated to a circuit temperature of 80–90 degrees. When cold, the sensor may give readings that deviate significantly from the norm.
There can be many signs of a device malfunction. They are represented by smooth signal characteristics or an increase in level not exceeding 0.1 V. In addition, it is worth paying attention to the shape of the curve - the changes should be quite steep, not allowing a smooth increase in voltage. Experts say that the lambda probe must change the signal level every 120 ms - otherwise it is possible to talk about its malfunction.
Car repair Almost all manufacturers of vehicles and individual components for them claim that the lambda probe cannot be repaired - it only requires complete replacement node. At the same time, its cost can be very impressive - especially if you own a car
If you are absolutely sure that the lambda probe is not functioning correctly as a result of combustion products deposited on it, you can try it. To do this, the device is dismantled at a surface temperature of 40–50 degrees, the protective cap is removed from it and the contacts are immersed in phosphoric acid. After several washes, the lambda probe is washed with clean water, thoroughly dried and installed in place, not forgetting to lubricate the threads with a special sealing paste. The tightening torque is set by the manufacturer - it usually varies between 40–60 Nm. This procedure helps in 80% of cases of the described malfunctions.
The main thing is timely diagnosis
If you discover in time that the car’s malfunction lies precisely in the breakdown of the standard lambda probe, you can carry out necessary repairs even before the consequences affect the engine, leading to significant damage. In addition, by eliminating this problem, you can save the most important characteristics vehicle at the same level, which will help you use it as fully and profitably as possible. It’s up to you to decide which troubleshooting method you choose, but it’s worth remembering that working with car electronics without the appropriate qualifications is very dangerous.
What is the connection between the catalyst and the lambda probe?
A lambda probe is an oxygen sensor installed in the exhaust system. There are one or two of them in the exhaust system of a car. The first sensor is always installed immediately after the exhaust manifold so that the exhaust gases flow around work surface sensor, and the second one (if there is one at all) immediately after the catalyst. The catalyst is designed to reduce emissions of toxic exhaust gases. A catalyst is a good thing, but it only works effectively under certain conditions. Without constant monitoring the composition of the fuel-air mixture, the catalyst fails very quickly - this is where an oxygen sensor, also known as a lambda probe, is needed.
The name of the oxygen sensor comes from the Greek letter L (lambda), which in the automotive industry denotes the ratio of excess air in the fuel-air mixture. The excess air in the mixture is measured in a very original way - by determining the residual oxygen content (O2) in the exhaust gases. At the optimal composition of this mixture, when 14.7 parts of air account for 1 part of fuel, L is equal to 1. The window for effective operation of the catalyst is very small: L = 1±0.01. Such accuracy can only be achieved using power systems with electronic (discrete) fuel injection and when used in a circuit feedback lambda probe. Therefore, the lambda probe is installed in front of the catalyst. The electrical signal of the sensor is read electronic unit controls the fuel injection system (ECU), which in turn analyzes and optimizes the composition of the mixture by changing the amount of fuel supplied to the engine cylinders. As we mentioned above, on some modern cars There is an additional lambda probe sensor, which is installed at the outlet of the catalyst. This allows you to increase the accuracy of mixture preparation and control the operation of the catalyst so that the three-component catalyst can fully fulfill its purpose and reduce the volume of harmful emissions to a minimum.
The lambda probe is mainly made of a zirconium alloy (a ceramic element based on zirconium dioxide coated with platinum is used) - a galvanic current source that changes voltage depending on temperature and the presence of oxygen in the environment. Its design assumes that one part is connected to the outside air, and the other to the exhaust gases inside the exhaust pipe. Depending on the oxygen concentration in the exhaust gases, a signal appears at the sensor output. The controller receives the signal from the lambda, compares it with the value stored in its memory and, if the signal differs from the optimal one for the current mode, adjusts the duration of fuel injection in one direction or another. That. feedback is provided to the injection controller and precise adjustment of engine operating modes to the current situation, achieving maximum fuel economy and minimum harmful emissions.
Possible causes of lambda probe failure:
1) low-quality gasoline - iron, lead clog platinum electrodes after several unsuccessful refills;
2) overheating of the sensor housing due to an incorrectly set ignition timing, a highly over-enriched fuel mixture;
3) oil in the exhaust pipe due to poor condition of the oil scraper rings;
4) malfunctions in the ignition system, popping noises in the muffler and exhaust that destroy fragile ceramics;
5) blows;
6) multiple (unsuccessful) attempts to start the engine at short intervals - this leads to the accumulation of unburned fuel in the outlet, which can ignite with the formation of a shock wave;
7) contact with the ceramic tip of the sensor by liquids, solvents, detergents;
8) when installing the sensor, use of sealants that vulcanize at room temperature or contain silicone;
9) open or poor contact or short to ground of the sensor output circuit.
Possible signs of a malfunctioning lambda probe:
1) unstable engine operation at low speeds;
2) deterioration dynamic characteristics car;
3) increased fuel consumption;
4) increasing the temperature in the area of the catalyst or heating it to a red-hot state;
5) characteristic crackling in the area where the catalytic converter is located after stopping the engine;
Is it possible to turn off the lambda probe after replacing the catalyst with a flame arrester?
After replacing the catalyst with a flame arrester, the presence of an oxygen sensor, as a part of the exhaust system, ensuring, among other things, the effective operation of the catalyst, becomes unimportant. Hence the question: is it permissible to operate a car without a lambda probe at all? There is no single answer for all cars. This problem can be solved most simply and correctly if of this car It is possible to reprogram the controller to operate without a catalyst. In this case, after replacing the catalyst with a flame arrester, the control program is changed and the lambda probe is simply removed and that’s it. For some car brands, reprogramming is impossible, and if a sensor malfunction greatly affects the operation of the engine, then there is no way out - it is necessary to install working sensor Lambda probe.
Lambda probe interchangeability.
Lambda probes recommended by the manufacturer and zirconium sensors of similar design can be interchanged. It is possible to replace unheated sensors with heated ones (but not vice versa!). However, this may cause problems with connector incompatibility and the lack of a power supply circuit for the lambda probe heater in the car. You can lay the missing wires yourself, and use standard car contacts instead of the connector. It is recommended to use graphite lubricant to prevent the sensor from sticking to the exhaust manifold.
Many car enthusiasts have encountered this problem increased consumption fuel. This can be due to many engine problems: malfunction of the idle speed sensor and drive, ignition problems, decreased compression, malfunction of the high-pressure pump.
But, if fuel consumption has increased significantly (up to 50%), you should immediately check the oxygen sensors; in car enthusiast practice they are often called “lambda probe”.
What is a lambda probe in a car
The lambda probe provides information to the engine control unit about the amount of oxygen that has not entered into an ignition reaction in the working cylinders of the engine. For complete combustion of oxygen, the mixture must be formed in a ratio of one to fifteen (more precisely 1: 14.7).
The engine control unit controls the formation of the mixture (eliminates the causes of the formation of rich or lean mixture) based on sensor readings, including oxygen (lambda probe).
Video - faulty sensor oxygen:
The name “lambda probe” was taken from qualitative characteristics the coefficient of excess air in the air-fuel mixture, denoted in the automotive industry by the letter of the Greek alphabet “lambda”.
Signs of a malfunctioning oxygen sensor
The main symptoms of a malfunctioning oxygen sensor include:
- significantly increased fuel consumption;
- uneven engine operation, especially when the accelerator pedal is pressed;
- increased emissions of toxic engine waste;
- malfunction of the catalyst.
The principle of operation of the lambda probe and common causes of its failure
The most common reason for lambda probe failure is wear. A typical probe design is shown in the figure:
The weakest points of the design are the ceramic tip and the electric heater. Burnout of the electric heater does not completely disable the sensor.
The lambda probe is installed in the exhaust manifold in front of the catalyst, and as the manifold is heated by the engine exhaust gases, it heats up to high temperature and myself oxygen sensor.
The electric heater mainly serves to ensure that the oxygen sensor readings are correct in the first few minutes after starting a cold engine.
There are one- and two-wire sensors in which there is no electric heater at all.
The ceramic tip is made of special porous ceramics, on which a thin layer of zirconium dioxide is applied, the electrodes are made of platinum using vacuum deposition technology (this is why lambda probes are expensive).
During operation, very high temperature exhaust gases pass through the micropores of the sensor. A thin layer of dioxide burns out over time, oxidizes, and its electrical properties change.
As a result, the lambda probe readings become unreliable, essentially rendering it unusable. In this case, all kinds of washing, cleaning, and other methods of restoring functionality are pointless.
Structurally, the operating principle of a lambda probe can be depicted:
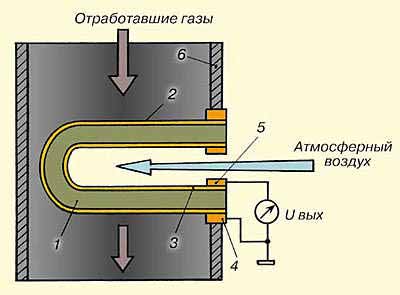
In the diagram: 1 – zirconium dioxide, 2,3 – electrodes (sometimes platinum), 4 – negative ground, 5 – output signal contact. The zirconium oxide probe acquires the properties of a solid electrolyte at a temperature of 300 to 400 degrees Celsius (which is why the sensor is preheated). The lambda probe then begins to register voltage according to the oxygen concentration.
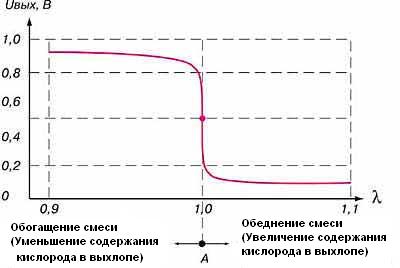
As can be seen from the graph, the dependence has a pronounced jump-like characteristic, which is very beneficial when processing signals using digital methods.
The following factors can accelerate the premature failure of the lambda probe:
- ingress of foreign impurities into the exhaust system (antifreeze in case of cylinder head gasket failures, ether residues when using “quick start” sprays when starting a car, oil when engine compression is low, etc.);
- high concentration of lead in fuel;
- cleaning the exhaust system with products not intended for this purpose;
- entry into the exhaust manifold of dust and impurities that were not removed by the fuel purification filter.
Many cars have two lambda probes installed, before and after the catalyst. This allows you to more accurately control the quality of the mixture, as well as check the efficiency of the catalyst.
How to check a lambda probe with a multimeter and other methods
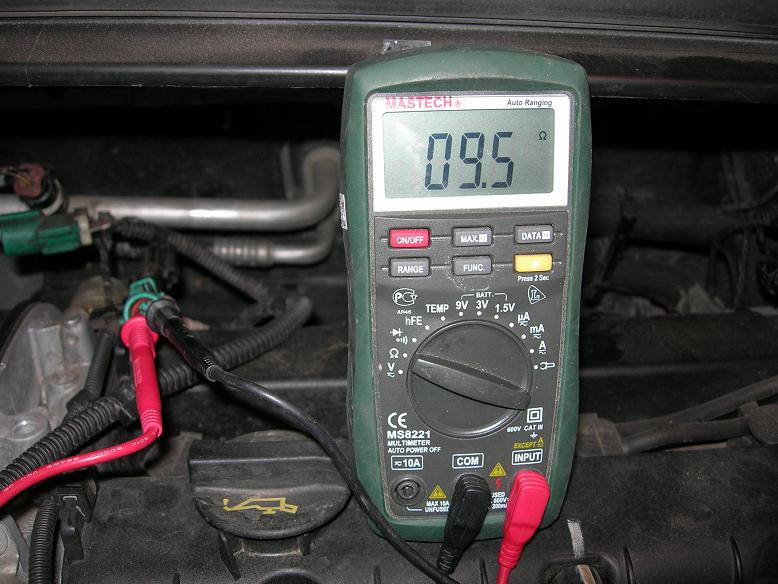
It is easier to start checking the performance of four-terminal lambda probes installed on most modern cars by monitoring the performance of the heating element.
To do this, you need to switch the multimeter to resistance measurement mode and “ring” the leads of the electric heater. They are usually made of larger gauge wire. The resistance should be less than 10 ohms. If the resistance is greater, this indicates a malfunction of the electric heater.
After 10,000 km of the vehicle, it is advisable to perform a visual check of the probe. To do this, the sensor must be removed from the manifold.
Many people use WD sprays or, even worse, brake fluid. If these liquids enter the working area of the lambda probe, it may malfunction.
Even if special tools are used when unscrewing a coked threaded connection, they should be removed immediately before removing the sensor.
In the working area of the sensor, you should pay attention to its color and condition. The presence of soot (a sign of an enriched mixture) leads to contamination of the sensor, for it better work soot should be removed.
White or gray deposits are evidence of the presence of additives in the oil or fuel; they can also lead to malfunction of the lambda probe. A shiny coating is a sign of excess lead concentration in the fuel. If there is intense plaque, the sensor must be replaced.
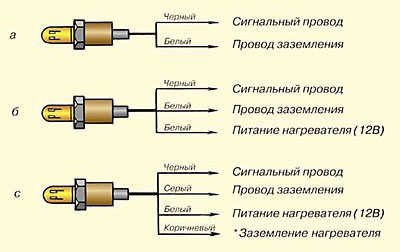
Contact pins of the most common zirconium oxygen sensors (b, c – lambda probe with a heater; a – without; * pin colors may differ from those indicated):
In order to check the lambda probe using a multimeter, you need to connect its probes to the signal wires and switch to the measurement limit of 2 Volts. Next, artificially create a situation of an enriched mixture, for example, by over-gassing, or by removing the pressure regulator connector. In this case, the multimeter readings should be more than 0.8 Volts, then the probe is working.
Then a lean mixture situation is created (you can artificially create an air leak by loosening the air duct clamp). The multimeter reading should be less than or equal to 0.2 Volts.
Video - how to check the lambda probe with a tester:
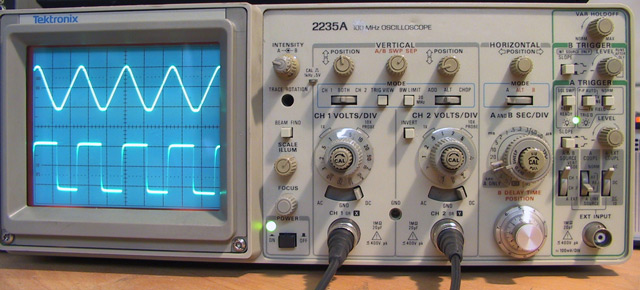
Allows you to view the parameters of the lambda probe in real time. This can also be done with a regular oscilloscope. The time dependence of the voltage at the signal output of a working lambda probe will have the approximate form:
If the lower limit drops to 0 Volts, the sensor is pretty “tired”; if the curve is more smooth, the sensor must be replaced.
Replacing the oxygen sensor
The mechanical difficulty of replacing a lambda probe is unscrewing the coked threaded connection. Here you may have to use special equipment. After removing the faulty sensor, thoroughly wipe the sensor installation area to remove any remaining liquids.
Video - replacing the lambda probe on an Audi A4 B5:
An original lambda probe is usually expensive (up to 6,000 rubles, sometimes more). For some car models, the original sensor cannot be found; it makes no sense to buy it from a disassembly site. In this case, it is better to install a universal lambda probe.
Universal lambda probe
The installation dimensions of the sensors (thread, seating depth) are usually the same, it is better, of course, to check so as not to damage threaded connection or a new probe.
Universal lambda probes are sold without a connector, only with wires (usually four wires, two signal and two for the heating element). Next, cut off the connector with wires from the old faulty original sensor and make a high-quality connection with the universal sensor in full accordance with electrical diagram connections.
It is better to make the electrical connection using the twisting + soldering + heat shrink insulation method. Since the typical characteristics of all lambda probes made using the same technology are almost identical, universal probes work correctly on engines of all modifications.
Video - installing a connector on a universal lambda probe:
When installing the sensor, pay attention to the tightness of the connection with the manifold and the integrity of the threads.
Cleaning
Cleaning the lambda probe is a last resort. It is performed only when there is confidence that the sensor accurately shows incorrect data and the last hope before sending it to the trash bin is cleaning.
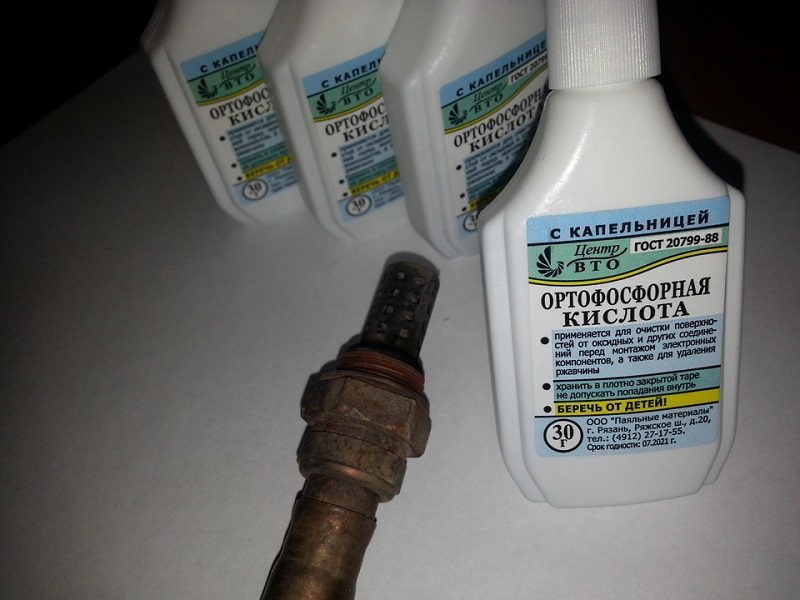
There is experience in cleaning the probe using phosphoric acid or a rust converter. In any case, only the working surface of the sensor needs to be cleaned. For this protective cover The lambda probe has to be removed.
It is better to clean it by regular washing, after immersing it in phosphoric acid. work area sensor for 20 minutes. You can clean it with a soft brush made of natural fibers. A good result can be obtained by using a goose feather as a brush.
The importance of timely replacement
Typically, the service life of lambda probes is short (from 10,000 to 50,000 kilometers). Some car enthusiasts do not pay attention to increased fuel consumption.
If we take into account that the sensor increases fuel consumption by at least 25%, with an average consumption of 7 liters per 100 km and a mileage of 10,000 km, the total consumption will be about 700 liters. If the sensor is faulty, the excess consumption will be under 200 liters. For the price of this fuel you can buy four sensors.
Timely replacement of lambda sensors and compliance with the rules of their operation are important for saving money associated with the operation of the car.
3 in 1: DVR + GPS informer + radar detector
How to protect yourself from the blinding sun and headlights while driving?
In engines internal combustion oxygen determines optimal ratio components combustible mixture, efficiency and environmental friendliness of engine operation. Lambda (λ) probe is a device for changing the volume of oxygen or its mixture with unburned fuel in the manifold power unit. An idea of the design and operating principle of the sensor will help the car owner to monitor its performance, preventing unstable work engine and excessive fuel consumption.
Purpose and principle of operation of the lambda probe
Lambda probe mounted on the exhaust pipe
Hard environmental requirements for cars, manufacturers are forced to use catalytic converters that reduce exhaust toxicity. But its efficient operation cannot be achieved without controlling the composition of the air-fuel mixture. Such control is carried out by an oxygen sensor, also known as a λ-probe, the operation of which is based on the use of device feedback and fuel system with discrete or electronic system injection.
The amount of excess air is measured by determining the residual oxygen in the exhaust gas. To do this, the lambda probe is placed in front of the exhaust manifold catalyst. The sensor signal is processed by the control unit and optimizes the air fuel mixture, more accurately dosing the fuel supply to the injectors. On some car models, a second device is installed after the catalyst, which makes the preparation of the mixture even more accurate.
Lambda probe works like galvanic cell with a solid electrode made in the form of ceramics made of zirconium dioxide doped with yttrium oxide, on which platinum sputtering is applied, acting as electrodes. One of them records atmospheric air readings, and the second - exhaust gas. Effective work The device is possible when the temperature reaches more than 300 o C, when the zirconium electrolyte becomes conductive. The output voltage appears from the difference in the amount of oxygen in the atmosphere and exhaust gas.

Oxygen sensor device (lambda probe)
There are two types of λ-probe - broadband and two-point. The first type has higher information content, which allows you to more accurately tune the operation of the engine. The device is made of materials that can withstand elevated temperatures. The operating principle of all types of sensor is the same, and is as follows:
- Two-point measures the oxygen level in the engine exhaust and atmosphere using electrodes on which the potential difference changes depending on the oxygen level. The signal is received by the engine control unit, after which the fuel supply to the cylinders by the injectors is automatically adjusted.
- The broadband consists of an injection element and a point-to-point element. It is supported on its electrodes constant pressure 450 mV by adjusting the pumping current. A decrease in oxygen content in the exhaust leads to an increase in voltage at the electrodes. After receiving the signal, the control unit creates the necessary current on the injection element to pump or pump out air to bring it to the standard voltage. So, when the fuel-air mixture is excessively rich, the control unit sends a command to pump in an additional portion of air, and when the mixture is lean, it affects the injection system.
Possible causes of lambda probe malfunction
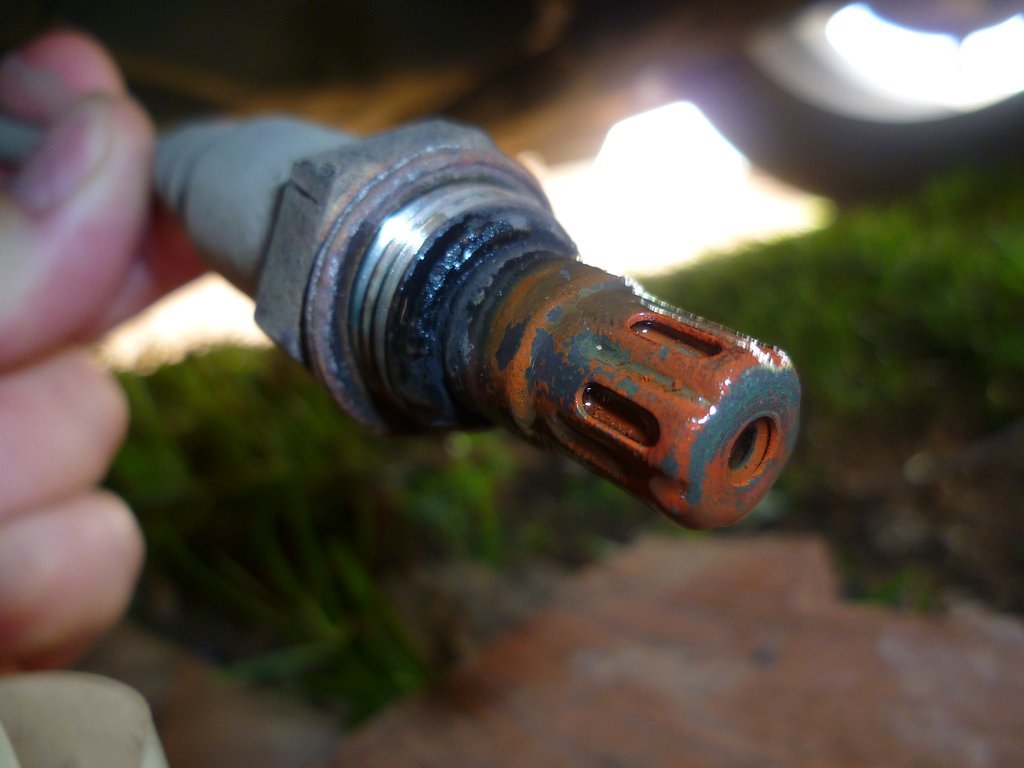
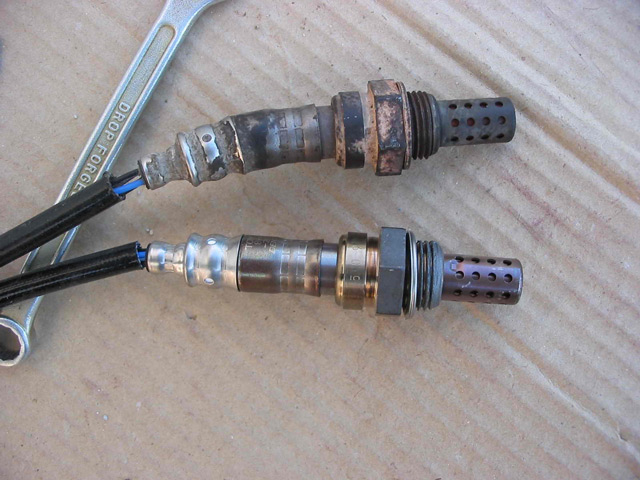
Appearance of a faulty lambda probe
Like any other device, the lambda probe can fail, but in most cases the car remains on the move, while its driving dynamics deteriorate significantly and fuel consumption increases, which is why vehicle needs urgent repairs. λ-probe failures occur for the following reasons:
- Mechanical failure due to damage or defect of the housing, violation of the sensor winding, etc.
- Poor fuel quality, in which iron and lead clog the active electrodes of the device.
- Hitting exhaust pipe oil if the oil scraper rings are in poor condition.
- Contact of solvents, detergents or any other operating liquids on the device.
- “Popping noises” from the engine due to failures of the ignition system, destroying the fragile ceramic parts of the device.
- Overheating due to incorrect ignition timing or rich fuel mixture.
- The use of sealant when installing a device containing silicone or vulcanizing at room temperature.
- Numerous unsuccessful attempts to start the engine within a short time, which leads to the accumulation of exhaust manifold fuel and its ignition, causing a shock wave.
- Short to ground, poor contact or lack of contact in the input circuit of the device.
Symptoms of a malfunctioning lambda probe
The main malfunctions of the λ probe are manifested in the following symptoms:
- Increased overall toxicity of exhaust gases.
- The engine is unstable at low speeds.
- There is excessive fuel consumption.
- When driving, the vehicle's driving dynamics deteriorate.
- When stopping the car after driving, a characteristic crackling sound is heard from the catalyst in the exhaust manifold.
- In the area of the catalytic converter, the temperature rises or it heats up to a red-hot state.
- Signal from the “SNESK ENGINE” lamp during a steady state of movement.
Methods for checking a lambda probe
Checking the lambda probe with a multimeter
For self-checkλ probe required digital voltmeter and vehicle owner's manual. The sequence of actions is as follows:
- The wires are disconnected from the probe block and a voltmeter is connected.
- The car engine is started, the rotation speed is set to 2500 rpm, and then reduced to 2000 rpm.
- Remove the vacuum tube from the regulator fuel pressure and record the voltmeter readings.
- At a value of 0.9 V, the sensor is operational. If the voltmeter does not respond at all, or the reading is below 0.8 V, the λ probe is faulty.
- To check in dynamics, the probe is connected to the connector, connecting a voltmeter in parallel and maintaining rotation crankshaft engine at 1500 rpm.
- If the sensor is working properly, the voltmeter will show 0.5 V. Deviation from this value indicates a breakdown.
Lambda probe repair
If the λ-probe breaks down, it can simply be turned off, and the control unit will switch to average fuel injection parameters. This action will immediately make itself felt in the form of increased fuel consumption and the appearance of an error in the engine ECU. If the lambda probe breaks down, it must be replaced. But there are technologies for “revitalizing” a faulty sensor, which make it possible, with a certain degree of probability, to return it to a working state:
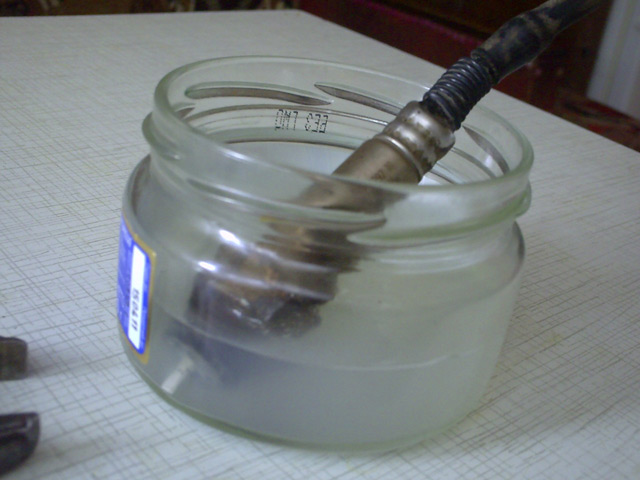
Repairing a lambda probe by soaking in phosphoric acid
1. Rinse the device with phosphoric acid at room temperature for 10 minutes. The acid eats away carbon deposits and deposited lead on the rod. It is important not to overdo it, so as not to damage the platinum electrodes. The device is opened by cutting off lathe the cap is at the very base, and the rod is dipped in acid, then washed in water and the cap is welded in its original place using argon welding. After the procedure, the signal is restored after 1-1.5 hours of engine operation.
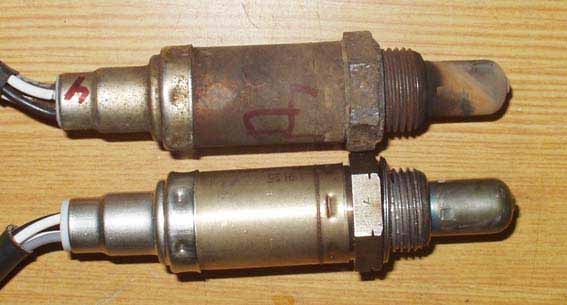
Old and new lambda probe
2. “Soft cleaning” of electrodes with an ultrasonic dispersant in an emulsion solution. During the procedure, electrolysis of viscous metals deposited on the surface may occur. Before cleaning, take into account the design of the probe and the material of its manufacture (ceramics or metal ceramics), on which inert materials are applied (zirconium, platinum, barium, etc.). After restoration, the sensor is tested using instruments and returned to the car. The procedure can be repeated many times.
The oxygen sensor, the symptoms of which are known to most experienced car owners, plays a significant role in the functioning of the car. Despite its inconspicuousness and small size, this regulator adjusts the fuel mixture, thereby assisting the power plant.
A car engine that receives a well-mixed air-fuel mixture operates as efficiently as possible. Unfortunately, the regulator sensor or lambda probe, as it is also called, tends to deteriorate.
Causes of malfunction and obvious signs
As a rule, the following reasons lead to malfunction of the sensor:
- Some aggressive liquid, such as antifreeze or brake fluid, gets on the sensor.
- Problems may begin if the owner used chemically active agents when cleaning the regulator body.
- If the car fuel contains a large amount of lead compounds.
- In case of significant overheating of the regulator, which occurs either due to the use of low quality fuel or due to a clogged filter.
Regulator malfunctions can be judged by obvious signs external character. It's easy to notice. It is enough to pay attention to the following points:
- Fuel consumption has increased sharply.
- The car jerks jerkily, even when the engine is warm.
- The color and smell of the exhaust gases have changed.
- The operation of the catalyst is disrupted.
Of course, the sensor is negatively affected by General terms operation. The electrical wiring or the regulator itself may be damaged if you do not pay attention to the standard operating procedures of the vehicle.
steps
In turn, experts see two main stages in the deterioration of the sensor.
At the first stage of sensor malfunction, there is an increase in the engine response time to pressing the gas pedal. The power unit reacts sluggishly, when you press the accelerator the “check” starts blinking, the pedal is lowered and the blinking stops. At this stage of the malfunction, the driver notices a deterioration in traction, acceleration dynamics and an increase in fuel consumption (not yet significant). As a rule, this stage of regulator malfunction can last about a year.
The second stage is much sadder. Most car owners at this stage think about why this oxygen sensor is actually needed. Normal acceleration disappears completely, the car “stumbles” even at absolute speed. smooth road. One more distinctive feature the second stage can be called a decrease in the speed of the power unit, even when the accelerator is pressed to the floor. In intake manifold popping noises may be heard. 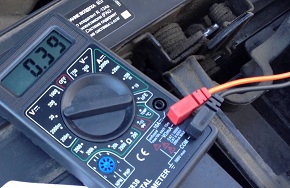
To be completely sure, it is recommended to start the car “cold”. If the oxygen sensor is faulty on the second severity scale, the car will only run perfectly for the first few minutes. When the device starts functioning, sending signals to the ECU, problems will immediately arise.
Regulator check
If there is a suspicion of a regulator malfunction, it is recommended to start by assessing its external condition. In most cases, if the sensor is faulty, it will become covered with a layer of dirt or grime. Normal appearance sensor, as a rule, indicates its normal operation, but the check should be continued.
- The regulator should be disconnected from the block.
- Then connect it to a voltmeter that has enough high class accuracy.
Note. The connection diagram of the regulator to the voltmeter should be based on its pinout: the black wire of the sensor is responsible for the signal (goes to the controller), the white wires are responsible for heating, the gray wire is for grounding.
Checking the voltmeter readings is a diagnostic based on operating dynamics power plant car. For example, if cruise mode is engaged (2500 rpm), with the vacuum tube removed, a normally operating regulator should output 0.9 V (slightly more or less). If the sensor readings are below 0.3 V, then the device is definitely faulty.
Checking the sensor may have another mode. You can simulate forced air leaks, thereby depleting the air-fuel mixture. In this case, the regulator readings should be less than 0.2 V.
Another check mode is associated with the intermediate position of the motor. In other words, if the engine speed is within 1500 rpm, the regulator should show a value of 0.5 V.
If the sensor is completely proven to be faulty, it should be removed and replaced. And here you need to adhere to certain rules.
- It is better to change the regulator on a working car, so to speak, “hot”. This gives you a better chance of not stripping the thread.
- It is also recommended to slightly raise the connector of the new regulator, thereby protecting the device from dirt and moisture.
- And finally, experts advise treating the sensor body with graphite, even with factory lubricant.
Almost all modern cars have an oxygen sensor. The device can be located in different ways. On some cars it is located near the catalyst, on others it is in the exhaust manifold. 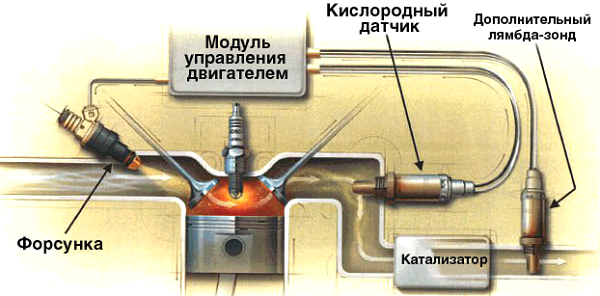
What to do if you find a faulty sensor on the road
If a sensor malfunction occurs on the road or you need to go somewhere urgently, but the problems with the probe are not resolved, what can you do? The solution is ingenious to the point of simplicity - you just need to turn off the probe. Of course, the blinking “check” will not disappear until the engine stops, and the dynamics, in principle, will not be normal. But you can easily get to a car service center, albeit without amenities.
You need to install a probe that is recommended by a specific car manufacturer. By installing some kind of “left” device, even for the sake of economy, you can subject the engine to unbearable loads and problems. Undoubtedly, engine repair will cost much more than purchasing a high-quality oxygen sensor.
Replacing the regulator
Replacing the oxygen sensor with domestic cars As a rule, it does not cause any particular difficulties. The only difficulty may be that the probe boils, after which it is practically unaffected by mechanical action. But even for such cases there is an effective and step-by-step instruction. It is given below.
- The car climbs onto the overpass.
- The protection of the power unit is removed.
- The hood opens and work begins with the probe wires. The wiring from the oxygen sensor can be found on the CO hoses (cooling systems). They are secured with clamps.
- The plastic clamp holding the wiring is cut;
- The sensor is unscrewed with a key set to “22”.
If the device is not removed, the sensor is boiling. We proceed according to the following scheme. We spray the regulator with WD-40, wait a little and try to remove it again. If it doesn’t work again, start the engine and heat it up a little exhaust system, water the regulator with water and try again. If that doesn’t help, you’ll have to heat the sensor directly with a soldering iron, tap it with a hammer (not too hard) and unscrew it.
The regulator is installed in reverse order removal You must remember to connect the connector and secure the wiring to the hoses.
Knowing the signs of a malfunctioning lambda probe, you can react to it in time and replace it. A normally functioning sensor means high-quality and trouble-free engine operation. A motorist should never forget this.